Organization Overview
INFO
For information about the GenAuth user pool version that supports the various benefits of the "Organization" function, please check the official website "Pricing" page. If your version does not support this benefit and you want to try it, you can activate the trial period. For an introduction to the trial period and how to activate it, please check the trial period.
With GenAuth, you can quickly implement role-based access control (RBAC). Simply put, RBAC refers to authorizing users to relevant permissions through their roles, which is more flexible, efficient, and scalable than directly granting user permissions.
In real life, groups and roles are often hierarchically nested in a tree-like structure. The most common ones are organizations, such as companies, schools, etc.
A common organizational structure is as follows:
- The first-level departments include product department, R&D department, operation department, and general management department
- There are second-level departments under the first-level departments, such as product managers and designers in the product department.
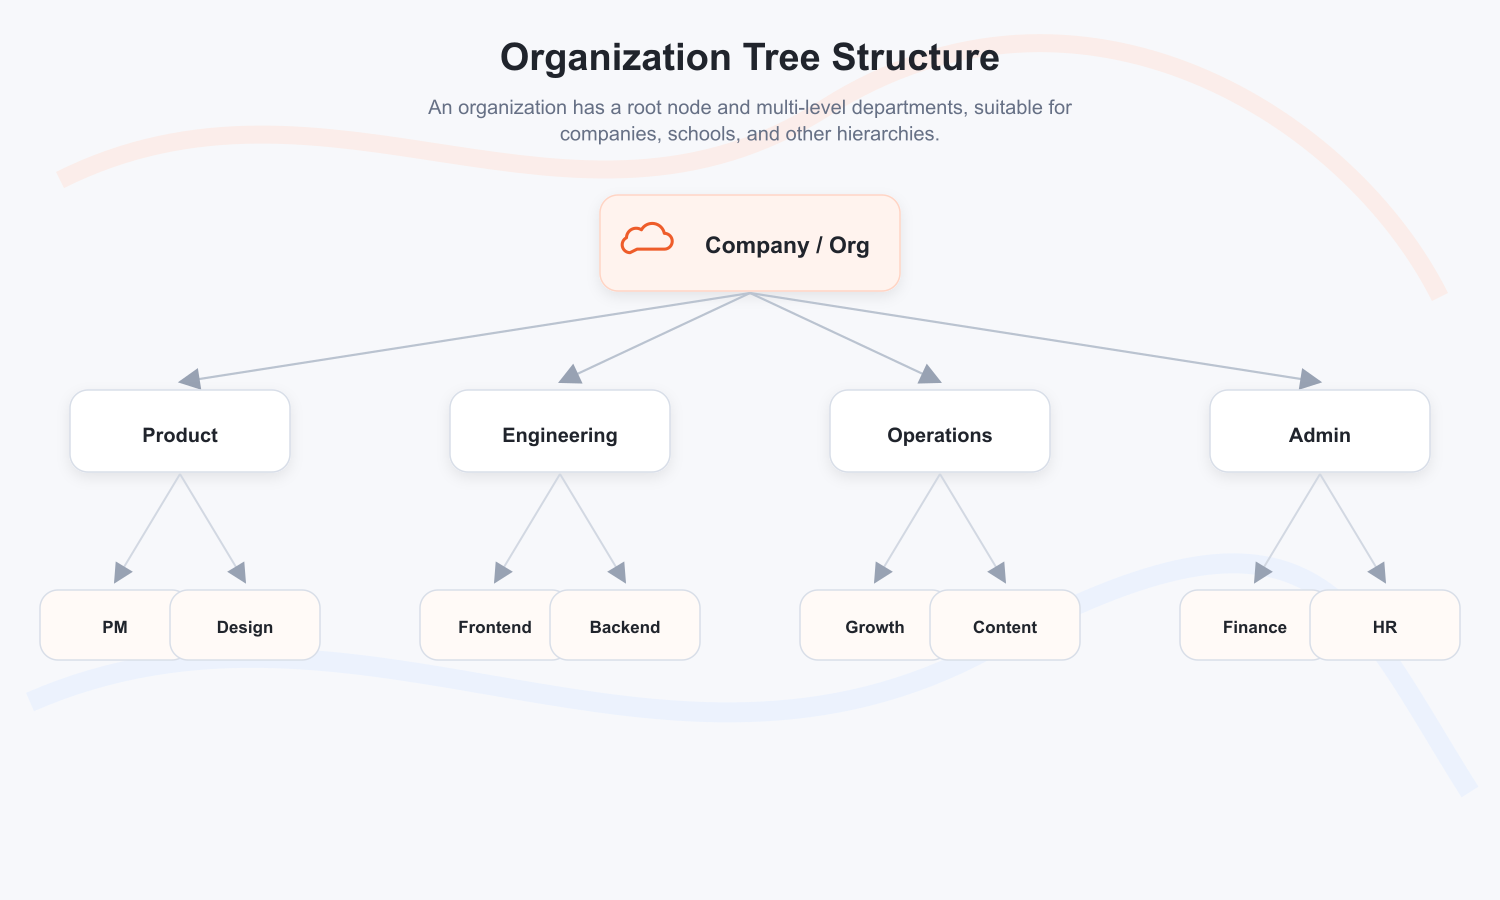
The above figure is a typical tree structure, in which there is only one root node. Generally speaking, the root node is a company or an organization. Each node corresponds to a hierarchical department.
In GenAuth, you can import organizations from third-party user directories such as WeChat Enterprise, DingTalk, LDAP, Active Directory, etc.. We also provide console and SDK methods for managing organizations. You can easily manage member life cycles and use LDAP protocol to open organizational data to the outside world.
Create or import an organization
If you haven't created your own organization yet, we recommend that you use GenAuth as the primary identity source to store user and organization data; if you store your own organization data elsewhere, we also support importing or syncing third-party organization data to GenAuth.
Create an organization
You can choose to create it using the console or API & SDK.
create-orgCode snippet: create-org
Import organization
GenAuth Organization supports importing organizations and users from the following channels:
- Excel
- Sync Center Sync (new version)
- WeChat for Enterprise
- DingTalk
- Feishu
- LDAP Server
- ...
- You can also use API & SDK to write user import scripts.
Manage Organization
Organization management includes operations such as adding sub-departments, modifying departments, deleting sub-departments, moving sub-departments, obtaining sub-department lists, adding members, deleting members, obtaining member lists, etc. GenAuth supports two operation modes: console and API & SDK.
INFO
- For B2E scenarios, you can see the Organization->Organization Management menu in the left navigation bar of the console, where you can manage the organizational structure and members under the corresponding hierarchical organization. For B2B and B2C scenarios, you can manage it in User Management->Organization.
- Currently, the new and old versions of the organization function in parallel, and you can choose according to your needs. To switch between the old and new versions, you can click the Switch Old Version / Switch New Version button in the upper right corner of the page on the Organization->Organization Management page.
Original-image links open source screenshots in a new tab. Labels identify the surrounding section and Chinese UI or unverified language.
Original image 1 (in section "Manage Organization"; Chinese UI)
Add sub-department
add-nodeCode snippet: add-node
Modify department
update-nodeCode snippet: update-node
Delete sub-department
delete-nodeCode snippet: delete-node
Move sub-department
move-nodeCode snippet: move-node
Get the list of sub-departments
list-childrenCode snippet: list-children
Add members
add-memberCode snippet: add-member
Delete members
remove-memberCode snippet: remove-member
Get the list of members
list-membersCode snippet: list-members
Manage member lifecycle
As the company grows, the number of internal applications and personnel will continue to increase. With the continuous entry and exit of employees, the frequent adjustment of the personnel organizational structure, the complex application account system within the enterprise, and the workload of administrators to manually operate accounts has increased sharply. At the same time, the lack of a unified account management control solution will also bring hidden dangers to the company's production safety, and there are often security risk cases where employees leave but the application account is not closed.
Replacing manual account management with automated Account Lifecycle Management (LCM) is the key to liberating enterprise IT personnel from the tedious and complex identity information management work involved in flexible employment. At the same time, it can also improve the overall business security factor of the enterprise by timely closing personnel accounts and reducing the authorization error rate.
Automated LCM covers multiple nodes involved in the employee lifecycle, from employee recruitment, employee employment, to employee resignation, including both administrator operations and end-user triggering behaviors, as follows:
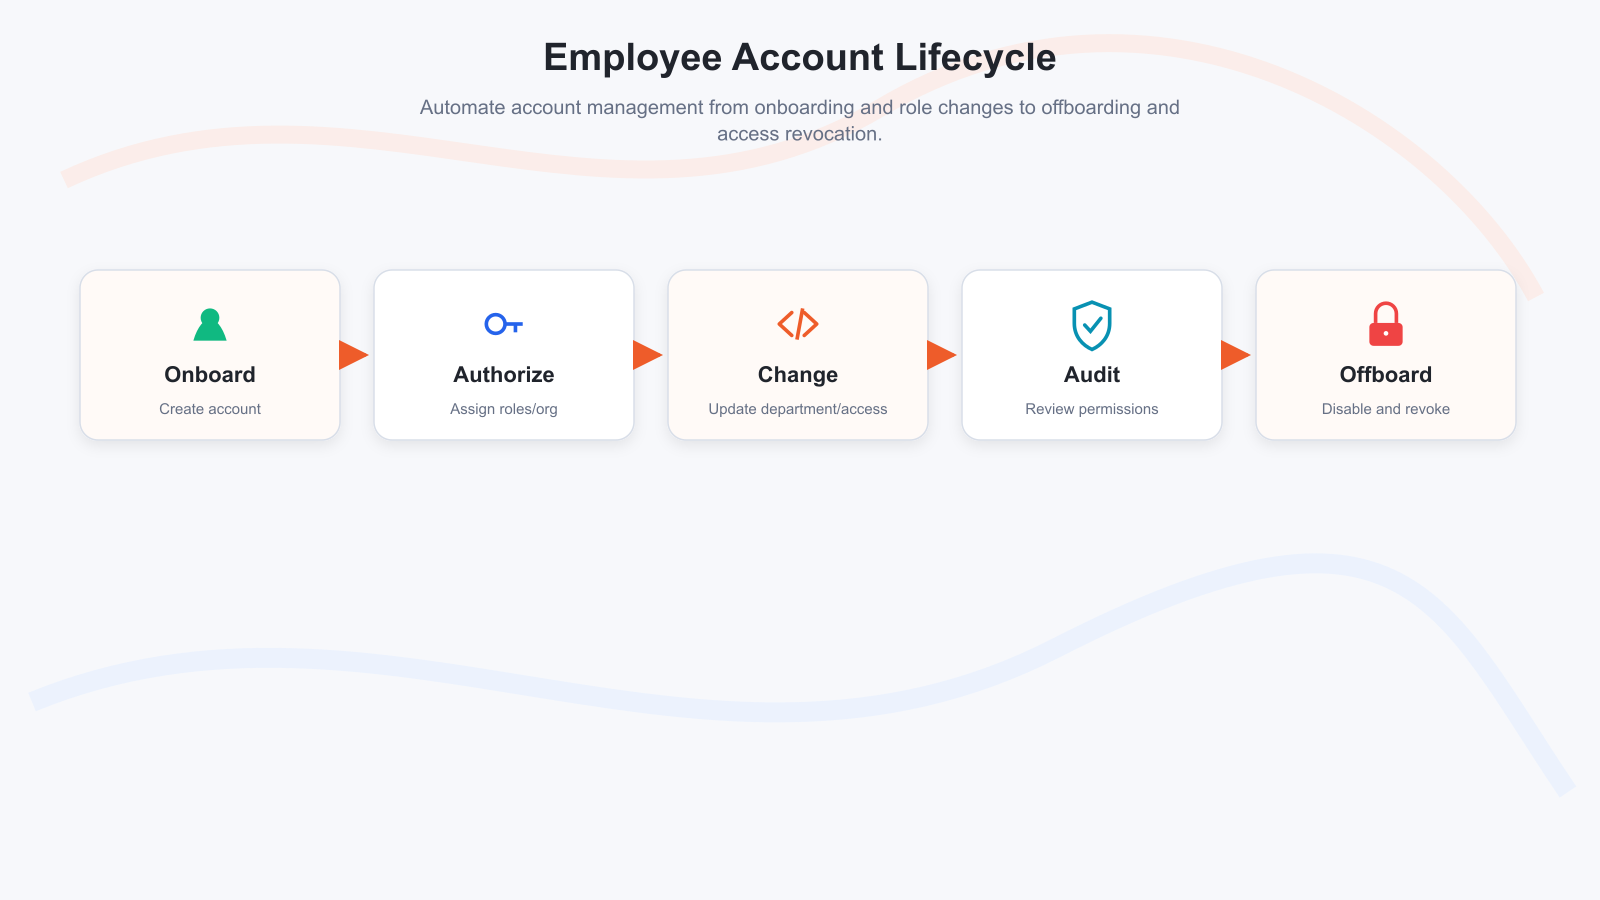
Account lifecycle management has the following advantages:
- Improve productivity and reduce costs.
- Reduce complexity.
- More secure and compliant.
You can read more about Account Lifecycle Management .
Old version of organization management
Member onboarding
You can onboard members on the console organization management page:
Original image 2 (in section "Member onboarding"; Chinese UI)
Create an account
You can create an account using a mobile phone number or email address:
Original image 3 (in section "Create an account"; Chinese UI)
Select an organization
You can specify the department for new employees:
Original image 4 (in section "Select an organization"; Chinese UI)
Authorize Applications
You can authorize the applications that new employees can access:
Original image 5 (in section "Authorize Applications"; Chinese UI)
Authorize Roles
You can authorize roles to the employee, so that the member automatically inherits all permissions granted to the role:
Original image 6 (in section "Authorize Roles"; Chinese UI)
View Details
Click the View Details button of an employee under the corresponding organizational level to jump to the user's details page in Member Management (for B2B and B2C scenarios, jump to the User List page).
Original image 7 (in section "View Details"; Chinese UI)
INFO
View Details Button
You can view user information, grant roles to the employee, authorize applications, and view the employee's application access log on the employee details page.
Original image 8 (in section "View Details"; Chinese UI)
INFO
View Employee Details
Lock / Unlock Account
You can temporarily lock an employee's account. After locking, the user cannot log in to the application until it is unlocked.
Original image 9 (in section "Lock / Unlock Account"; Chinese UI)
INFO
Lock Account
Original image 10 (in section "Lock / Unlock Account"; Chinese UI)
INFO
Unlock Account
Change Department
If a member needs to change departments during his/her employment, he/she can click the Change Department button in the employee's row on the Organization Management page, and select the target department in the window that opens, or search in the search box and select:
Original image 11 (in section "Change Department"; Chinese UI)
You can also select members in the member list under the corresponding level organization, and then click the Change Department button above the member list to open the Change Department window to make changes.
Original image 12 (in section "Change Department"; Chinese UI)
Set the main department
If the current member belongs to multiple departments, you can set one as the main department. To do this, you can click the Set Main Department button in the row of the target member in the user list on the Organization Management page:
Original image 13 (in section "Set the main department"; Chinese UI)
Then select and confirm the main department in the open window:
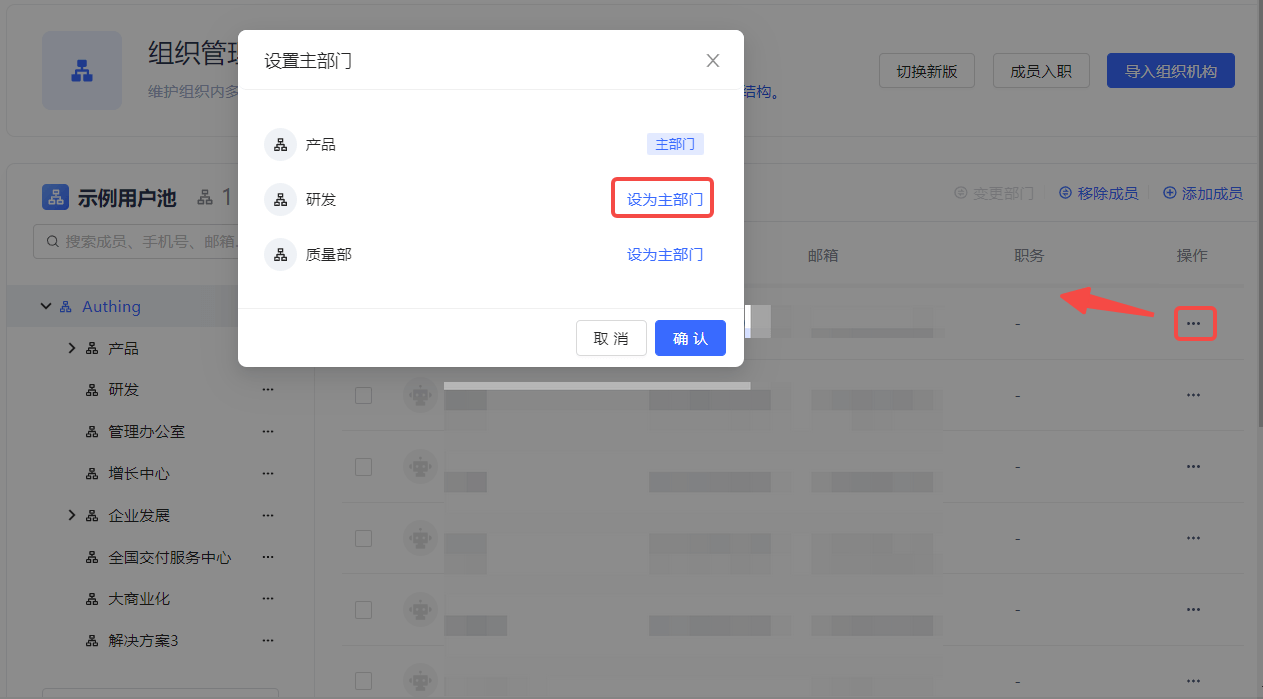
Disable / Enable employee accounts
In an emergency such as an account being stolen, you need to temporarily disable the employee account. You can click the Disable Account button in the row of the employee on the Member Management page (User List page for B2B and B2C scenarios).
Original image 14 (in section "Disable / Enable employee accounts"; Chinese UI)
After disabling the account, the following operations will be performed automatically:
- Cancel the application authorization relationship.
- Cancel the policy authorization relationship.
- The account cannot log in.
- The department relationship is still retained.
- User information can still be edited.
After confirming safety, you can Enable Account in the same path. Then the account permissions will return to normal.
Original image 15 (in section "Disable / Enable employee accounts"; Chinese UI)
Handle resignation
You can handle employee resignation on the Organization Management page.
Original image 16 (in section "Handle resignation"; Chinese UI)
After an employee leaves, the following operations will be performed automatically:
- Cancel the application authorization relationship.
- Cancel the policy authorization relationship.
- The account cannot be logged in.
- Move out of the original department and move to the department where the employee has left.
- Keep the basic user information and delete the department, role, and group relationship of the employee.
INFO
This operation cannot be restored, please operate with caution!
Delete Account
After processing the resignation of an employee, the Delete Account button of the employee under Member Management is activated:
Original image 17 (in section "Delete Account"; Chinese UI)
Deleting an employee account will completely delete all user-related data. Such as:
- User data
- Application authorization
- Policy authorization
- Department relationship
- Group relationship
- Role relationship
- Delete from user pool
- Login history
New version of organization management
Member onboarding
You can onboard members on the console organization management page:
Original image 18 (in section "Member onboarding"; Chinese UI)
You can create an account using a mobile phone number or email address, enter your name, mobile phone number/email, and select department in the Member onboarding window:
Original image 19 (in section "Member onboarding"; Chinese UI)
Newly added members will be displayed in the user list:
Original image 20 (in section "Member onboarding"; Chinese UI)
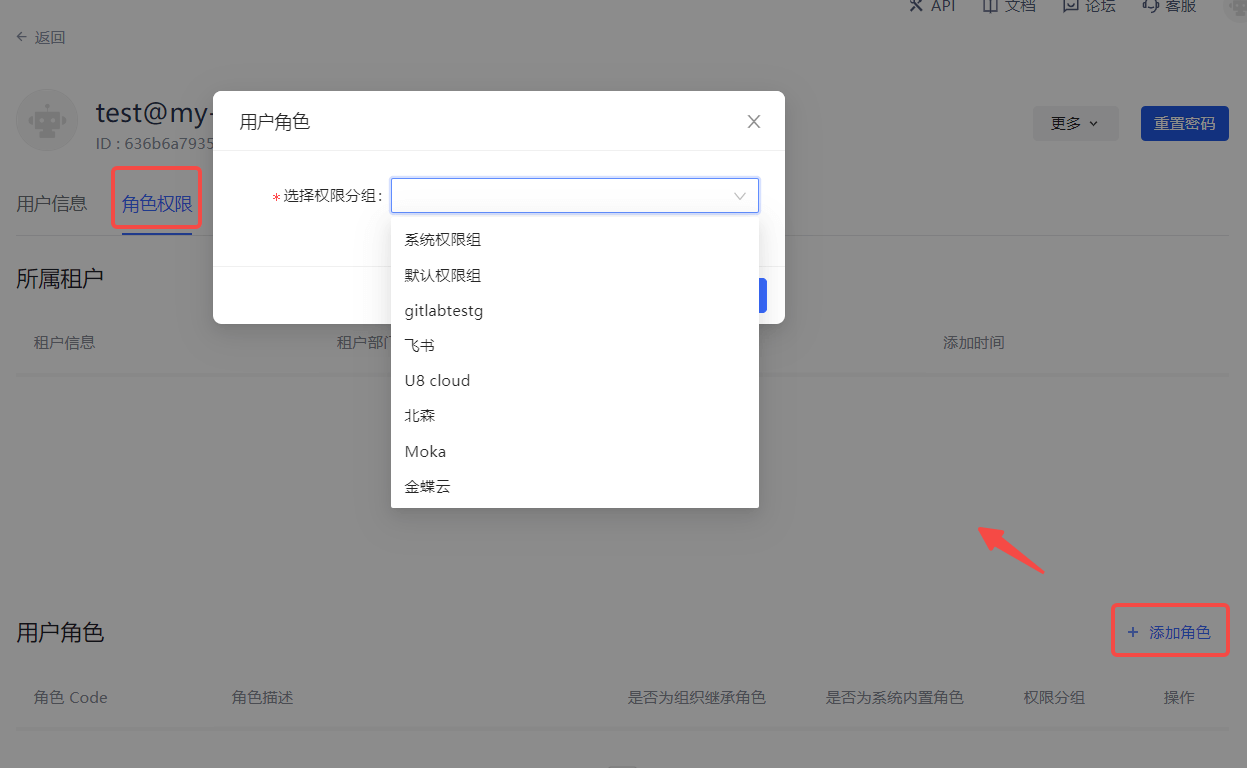
Click on the newly added member in the list to enter the user details page, where you can grant role authorization and application authorization:
INFO
Role authorization
Original image 21 (in section "Member onboarding"; Chinese UI)
INFO
Application authorization
Disable/enable employee account
In case of emergency such as account theft, it is necessary to temporarily disable the employee account.
After disabling the account, the following operations will be performed automatically:
- Cancel the application authorization relationship.
- Cancel the policy authorization relationship.
- The account cannot log in.
- The department relationship is still retained.
- User information can still be edited.
Employee accounts can be disabled/enabled in two paths.
Disable/Enable Accounts Under Organization Management
Click the Disable Account button in the row of the employee on the Organization Management page and confirm in the pop-up window.
Original image 22 (in section "Disable/Enable Accounts Under Organization Management"; Chinese UI)
You can also re-enable the account in the same path:
Original image 23 (in section "Disable/Enable Accounts Under Organization Management"; Chinese UI)
Disable/Enable Accounts Under Member Management
Click the Disable Account button in the row of the employee on the Member Management page (the User List page for B2B and B2C scenarios).
Original image 24 (in section "Disable/Enable Accounts Under Member Management"; Chinese UI)
After confirming safety, you can activate the account in the same path. Then the account permissions will return to normal.
Original image 25 (in section "Disable/Enable Accounts Under Member Management"; Chinese UI)
Change department
If a member needs to change departments during his/her employment, he/she can click the Change department button on the Organization management page, check the target department in the open window, or search in the search box and check it. The changed department will be displayed in the list on the right side of the window:
Original image 26 (in section "Change department"; Chinese UI)
Set the main department
If the current member belongs to multiple departments, one can be set as the main department. To do this, just click Set to Main Department in the department list on the right side of the Change Department window above, and then click OK:
Original image 27 (in section "Set the main department"; Chinese UI)
You can also click the Set Main Department button in the row of the target member in the user list on the Organization Management page:
Original image 28 (in section "Set the main department"; Chinese UI)
Then select and confirm the main department in the open window:
Original image 29 (in section "Set the main department"; Chinese UI)
Set as Person in Charge
You can set persons in charge for organizations/departments at different levels.
INFO
You can set persons in charge across departments. However, the person in charge label will only be marked if the selected person is a direct member of the selected department.
There are two ways to set the department head:
- Click the More button after the department to be set in the organization tree, and select Set department head.
Original image 30 (in section "Set as Person in Charge"; Chinese UI)
- Set the head in the user list corresponding to the organization:
Select the organization/department in the organization list on the left.
Click the row of the corresponding member in the user list of the current organization/department on the right Set as head.
Original image 31 (in section "Set as Person in Charge"; Chinese UI)
The selected member becomes the head of the organization/department.
Original image 32 (in section "Set as Person in Charge"; Chinese UI)
Handling Resignation
You can handle employee resignation on the Organization Management page.
Original image 33 (in section "Handling Resignation"; Chinese UI)
After an employee resigns, the following operations will be performed automatically:
- Cancel the application authorization relationship.
- Cancel the policy authorization relationship.
- The account cannot log in.
- Move out of the original department and move to the department where the employee has left.
Deleting an Account
You can delete the employee account simultaneously when handling resignation:
Original image 34 (in section "Deleting an Account"; Chinese UI)
Resignation and account deletion can also be performed in steps:
First, handle resignation on the Organization Management page.
Then delete the account in member management.
Original image 35 (in section "Deleting an Account"; Chinese UI)
All user-related data will be completely deleted. For example:
- User data
- Application authorization
- Policy authorization
- Department relationship
- Group relationship
- Role relationship
- Delete from user pool
- Login history
Manage terminal devices
Device management
The device management function is designed to manage all web, mobile, and PC devices that log in to the user pool application; by logging in to the user pool application, the terminal device actively reports the device information to the user pool, and the ultimate management capability of the device is achieved by removing, suspending, and deactivating the device.
Device management on the administrator side
- Click the "Organization"-"Device Management" module to enter the device list, where you can see the basic and usage information of all devices, and can remove/suspend/deactivate the device. Enabled operations;
Original image 36 (in section "Device management on the administrator side"; Chinese UI)
- In the device management list, click on a device information to enter the device information details page, where you can see all account information, device security information and active information of the device;
Original image 37 (in section "Device management on the administrator side"; Chinese UI)
- Click "Organization" - "Member Management" - "Member Details" page, users can see all device information logged in with the account, and can remove, suspend, and deactivate operations;
Original image 38 (in section "Device management on the administrator side"; Chinese UI)
User-side device management
- Web-side application personal center: In the Web-side application personal center, you can see all devices logged in to the application under the user;
Original image 39 (in section "User-side device management"; Chinese UI)
- GenAuth token mobile app: Open the GenAuth token app, enter the mobile app corresponding to the user pool, and log in. After logging in, you can see the "Device Management" module in the personal center. After clicking to enter, you can manage the devices logged in by the account under the app:
Original image 40 (in section "User-side device management"; Chinese UI)
Manage devices through "Manage Data Objects"
- First, in a user pool with the "Manage Data Objects" function turned on, open the "Settings"-"Manage Data Objects" page, click the "Terminal Device Management" module, and enter the terminal device management module:
Original image 41 (in section "Manage devices through "Manage Data Objects""; Chinese UI)
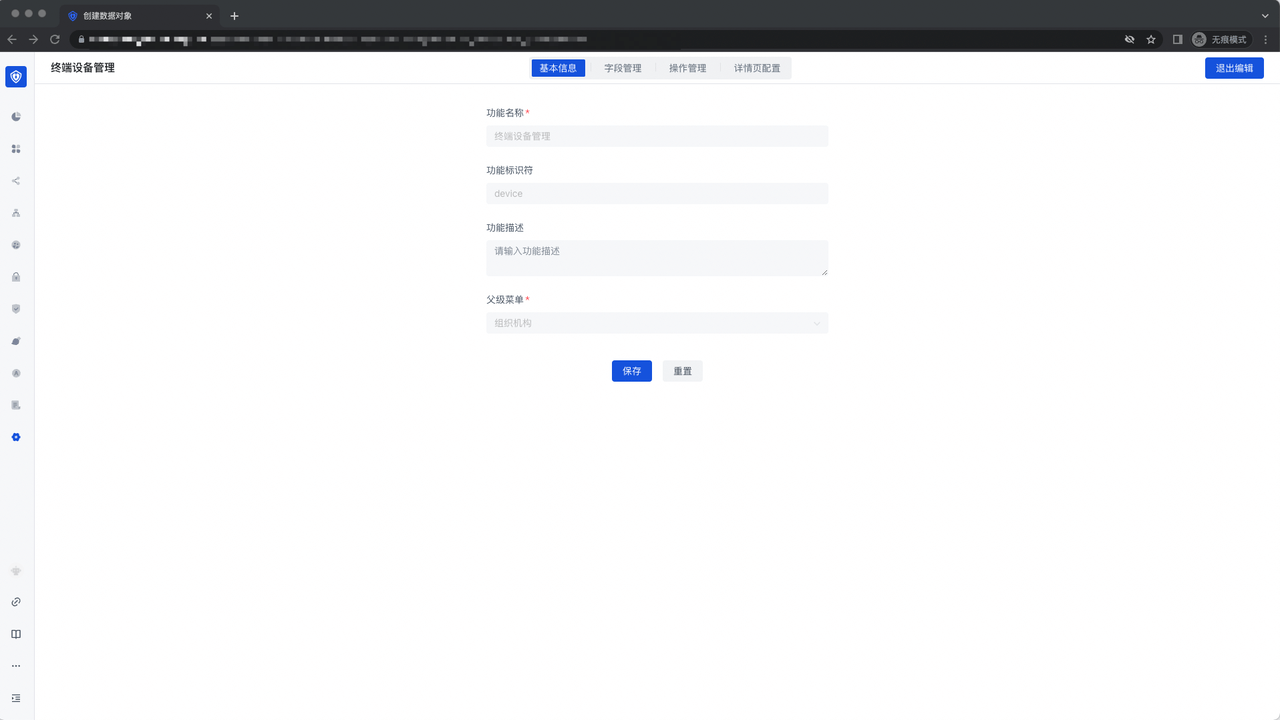
- In the basic information of the "Terminal Device Management" function, the defined function name, function identifier, function description and parent menu are displayed and cannot be modified:
- Field Management: Displays all fields related to the device management function, and you can choose whether to display and edit them:
Original image 42 (in section "Manage devices through "Manage Data Objects""; Chinese UI)
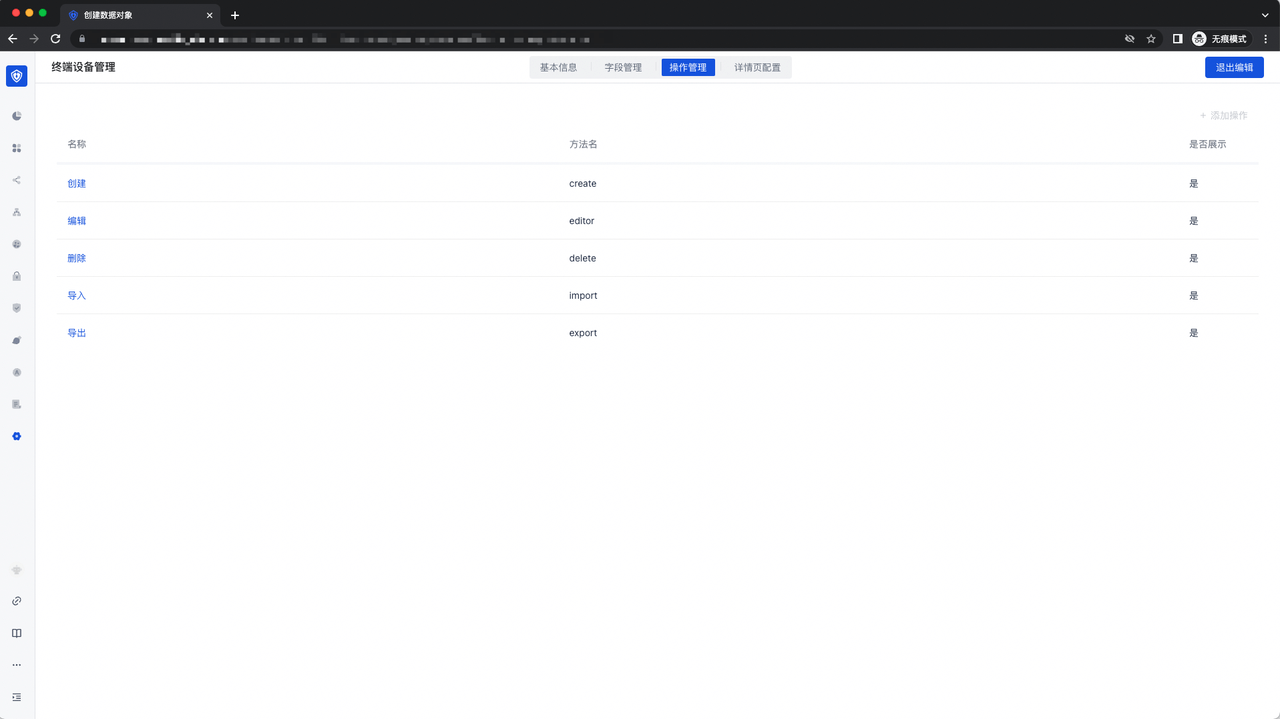
- Operation Management: Displays the general form operation capabilities for device management, including "Create", "Edit", "Delete", "Import", and "Export" capabilities;
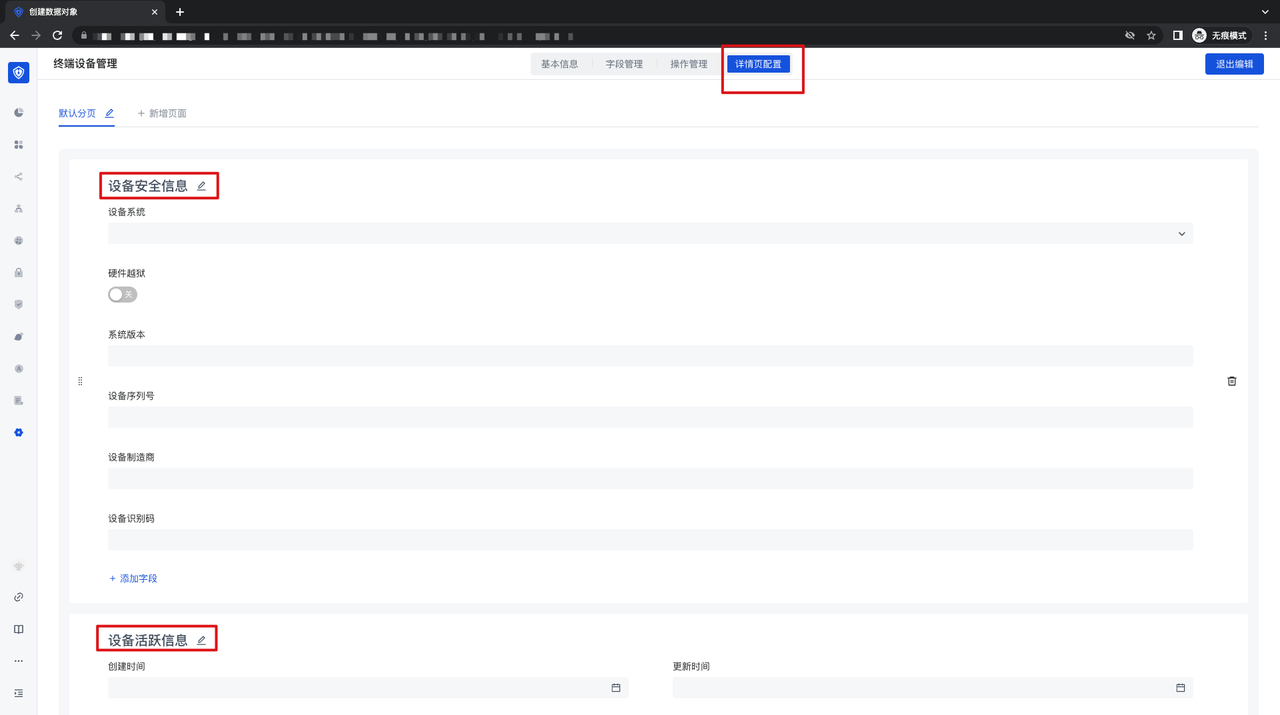
- Details Page Configuration: Displays the configuration of a device details page, and you can modify the details page. Tab and the corresponding fields for configuration;